The Unvarnished Geek
Making Tech Sane Again
Project maintained by UnvarnishedGeek Hosted on GitHub Pages — Theme by mattgraham
Plain-Text Writing Lesson: Pandoc Magic
Pandoc: The Magic Wand of Sustainable Document Conversion
Now that you’ve had some fun playing with a text editor and Markdown syntax, it’s time to work a little magic on your plain-text writing.
Think of Pandoc like a magic wand: it’s a tool that takes your markdown text files and, with a few words, transmutes them into fully-formatted documents in the style of your choice (or the format required by a publisher). You can output to many different file types, including .docx (the native Word format), .odt (the native format for Openoffice and LibreOffice), .rtf (Rich Text Format, readable by many different applications), .html (the format for web pages and blogs), and even (with a few software additions) PDF.
The one drawback of Pandoc, for the non-techy person, is that it’s a command line tool. In other words, there’s no snazzy graphical interface with pretty buttons to click. It works entirely with text commands inside a terminal window.
A terminal is simply an application on your computer that allows you to interact with it via text commands rather than graphical buttons. If you’re old enough to have worked with programs in MS-DOS, you’re already familiar with a command-line interface. There are two great things about command-line tools:
- They’re incredibly fast. They tend to start instantly and work very quickly, just like your compact text editor.
- They can be even more powerful and offer more options and functions than graphical tools. Think about it this way: a graphical tool is limited, in many ways, by the amount of space it takes up on your screen: there’s only room for so many buttons. A command-line tool can have as many available functions as its creator can imagine.
The drawback is the flip side of the advantages: you have to learn the text commands.
Luckily, you can do basic conversion with Pandoc with only a few commands, so it’s pretty darned easy.
Getting Pandoc
Let’s start by downloading and installing Pandoc.
- Go to this page.
- Scroll down until you see two large green buttons.
- If you have a Windows computer, click the one that says “pandoc-1.13.1-windows.msi.”
- If you have a mac, click the one that says “pandoc-1.13.1-osx.pkg.”
Go ahead and install the downloaded file (the one assumption I’m making is that you know how to install software on your OS of choice. If you need help with this, please leave a comment to that effect!).
Create a sample document
Let’s create a sample markdown document to work with. You can either type this in yourself or just copy it from here and paste it into your text editor (make sure each line is flush all the way to the left):
###Sample Markdown Document

*****

**Here's a lovely bulleted list:**

- With this lovely line
- And this even lovelier line
- Iambic lines are very nice as well.

And just to show off an important function for academics, let's include a sentence that ends with an inline footnote.^[And here's the text of the note.]
Go ahead and paste this into a document in Gedit. When you save your file, make sure you save it with the “.md” extension (i.e. “Sample.md”). That’s how Pandoc will know it’s a markdown document. For the sake of this lesson, let’s save this document as “PandocTest.md”.
Save the file in a convenient folder on your hard drive (usually the “My Documents” or “Documents” folder).
Fire up A Terminal
This is where things get a little bit techy. But don’t worry–it’s not really all that techy, and ultimately pretty easy!
Start by opening a terminal window on your computer so you can issue text commands.
- For MacOS: Open a Finder window and go to Applications and then Utilities; then double-click on Terminal. You can also click the spotlight icon in the upper right-hand corner of your screen and type “Terminal.”
- For Windows 7: Click click the “Start” button, and navigate to “Accessories” and then “Command Prompt”
- For Windows 8: Swipe up or click on the down arrow icon at the bottom of the screen. When you’re on the Apps screen, swipe or scroll right and located the Windows System section heading. Then click on Command Prompt.
Work Some Magic
Now that you’ve got a terminal open, we can type the commands we need to get Pandoc to work its magic.
Start by making sure you’ve got Pandoc installed. To do that, just type:
pandoc --version
You should see a message telling you what version of Pandoc is installed along with a lot of other information.
Assuming that’s the case, let’s actually convert our document.
First, change to the directory in which you saved your test document. To do this, you use the text command “cd” (for “change directory,” naturally!). So, if you saved your test file in the “My Documents” directory in Windows, type:
cd My Documents
If you like, type “ls” (mac) or “dir” in Windows and you should see a list of files in the current directory. Make sure your “PandocTest.md” file is there.
Then it’s just a matter of using some text commands to tell Pandoc which file you want to convert and what you want to convert it to. The general syntax works like this:
- Start with the command that invokes the Pandoc program. Conveniently, this is just “pandoc”
- Then tell pandoc which file you want to convert. In this case, our file is called “PandocTest.md”.
- Then tell pandoc what format you’re converting from. Do this with the flag “-f” followed by the file type (“markdown” in this case)
- Next, we tell what kind of file we want our final output to be. Do this with the flag “-t” followed by the file type (in our case, “docx”)
- Then we’ll tell Pandoc to create a standalone file, put its output in that file, and name the output file, like so :”-s -o PandocTest_Output.docx”
Do do all this, just type all the preceding commands into one line in your terminal, like so:
pandoc PandocTest.md -f markdown -t docx -s -o PandocTest_Output.docx
Then just press Enter. Your computer may think for a few seconds, but when a new command prompt appears, you’ll be done.
Finally, either use your file manager (that’s “explorer” in Windows) or Word to open the new file you just created. You should see your new, fully-formatted document, which should look something like the image below. 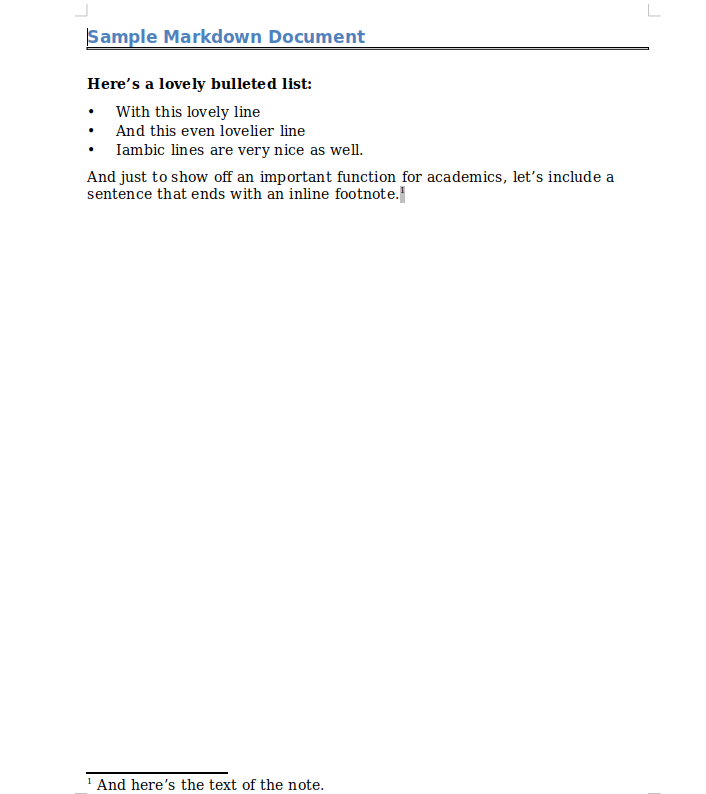
That’s your first conversion with Pandoc! We’ll cover more aspects of Pandoc in subsequent lessons, but, for now, just try creating and converting some documents according to your needs and play around.
Comments powered by Talkyard.